Please Note: This Design is not being developed or maintained, and is now obsolete, please go for either the REDUX or the PRO
DIY Steam Machine: REDUX
DIY Steam Machine: PRO
If anyone would like to support me and my work, please feel free to donate/tip me on:
Australia and International: I've created a new online store as eBay fees and the shipping costs are just ridiculous, I've found the cheapest platform I could, so the price has come down on both the case and the shipping: https://nexgen3d.bigcartel.com/
A small donation is made to me on every case sold by these Etsy seller's is made to me.
Update 12/02/2026:
I've uploaded a version of the rear case to support the slightly larger server FLX power supplies, this allows for the extra width, I don't have one of these power supplies, so I will need feedback form the community on fitment.
Update 11/02/2026:
I've added a pin out diagram image for the FSP500-30AS Power Supply, please scroll all the way to the bottom to find it.
I've added a new limited edition colour scheme to the case's I sell on my website, I call it The Scandi its a matte white case with brown wood infused panels, and a mirrored alt version.
For this scheme you will want a stainless steel Power Button
Update 31/01/2026:
I have now uploaded a new version of the Rear Case with support for the 180 Degree USB Adaptors, make sure to buy the black one, NOT the blue one, I have also uploaded a Blank Cover for holes, so if you only want to run one, or none, you can print off a couple of blanks, PETG should be enough, or you can do in TPU if you have some.
Update 30/01/2026:
I've added a video to the how too section at the bottom of this page showing how to install the threaded inserts.
Update 28/01/2026:
I have created a new mount for the LOP series of Power Supplies from Meanwell, this mount has to sets of mounting locations, and is now supports the LOP-300/400/500/600 but the compromise is you need to run dual 4010 fans, you cant run 4020's as there just isn't any room for it, so I suggest investing in good 40mm fans like the dual ball bearing ones from GDStime or some Noctua ones.
I've updated the BOM to suit the new mount, I will leave the old ones there for those that want to use them,
Update 22/01/2026:
I'm now back from my trip and I will be making an alternative rear case to accommodate the 180 degree USB adaptors, I will do one for the USB 3.0 and one for the USB 2.0, and a snap in blank to cover them if not used.
Will be creating a blank cover for the Switch hole and the USB Hub slot for those that would like the option to add these later but would like to cover the holes.
All version 3 front styles have been uploaded and completed, please let me know if there is any issues.
-> NOTICE 12/01/2026 <- Please hold of on printing the case, I'm currently uploading the new version 3 case, this has some fixes and adjustments, increased exhaust slot size and tighter alignment of the 120mm cooling fan, and I have moved the cable access for the USB Hub, to above both USB ports, I have created a Version 3 folder, and over the next few days, I will be adding all of the different flavours of front cases, today, I have added the new rear case section, and the new front with logo, switch and USB hub.
Note: Please scroll to the very bottom of the post to see the correct orientation on you build plate, no supports required, manual filament change can be performed for the first few layers for the logo printing, so you don't need a multi material printer, it can be done on any machine through your slicer.
How To: For tips and guides on certain things, like how to open the fin stack of the cooler, I will add to the very bottom of this page, so please scroll down and take look.
Update: 15/01/2025
New Front Case Designs!
YouTube Performance Video:
This is the first time I have done this, but will I earn a few cents from some of these items linked here in the BOM, you certainly don't have to use them, the parts wont cost any different, but it just helps support my work if you do buy them through these links, if you find an alternative that is cheaper, then this is perfectly fine :)
Updated BOM:
The BC-250 Single Board Computer:
Recommend Power Supplies:
US Market (eBay): FSP500
Lower Cost Alternative PSU:
Amazon: 400w Generic
Global: 400w Generic
Alternative High Quality Power Supply Setup (Not Recommended for Novices):
Global: Meanwell LOP-300/400/500/600
Global: AC-14-F16B-2
Global Multiple Links as they Often Sell Out (Requires 10 x M3x3.5x4.6x6 and 3 x M4x5.6x6.3x7.1):
LOP-400/500/600 Require 4 x M3x10mm Bolts
LOP-300 Require 4 x M3x8mm
The Fans will will require 8 x M3x20mm
The Mount its self will require 3 x M4 x 10 to 15mm
I recommend just picking up a kit of bolts, as its easier: 500 Piece Socket Head Bolt Kit
Recommend Fan: Artic P12 Pro
Amazon: Arctic P12 Pro
Alternative Fan: Arctic P12 Max:
Amazon: Arctic P12 Max
If you are feeling rich, then this performs very similar to the P12 Pro:
Amazon: Noctua NF-F12-IPPC3000
Supported WiFi and Bluetooth Combo:
Amazon: TP-Link AX900
Global: AX900 Generic
16 x M3 Threaded Inserts (recommend and designed for M3x3.5x4.6x6):
Global Multiple Sellers as They Often Sell Out (Requires 16 of these):
16 x M3 x 10mm Black Stainless Flat Socket Head Bolts:
Amazon: M3 Socket Head Bolt Kit
16mm Latching 12v Switch with LED:
Compatible USB 3 Hub:
Amazon: Anker 4 Port USB 3 Hub
Optional:
Amazon: Display Port to HDMI Cable
Amazon: Thermal Pad Kit
Update: 8/01/2026
I have now under request, created a new mount for the LOP-300 Power Supply, this now supports a 3 prong power cord with a switch and a fuse.
Link to the required socket switch combo: AC-14-F16B-2
The mount will require 13 x M3 Heat Inserts, normal 4.5mm thick ones will work fine
Its dimensions will now match the FLX in size.
Update: 7/06/2026
Updated the images for the correct orientation of the parts to reflect the updated part designs.
I've re-uploaded the following as it was reported to have been a corrupt file: Case Front - No USB - Logo - No Switch
I've uploaded an alternative fan mount and pressure booster for those that unfortunately decided to bend the fins up, instead of removing them, this mount adds another 1.2mm clearance, I will need feedback on this, as I have no way to verify if this is enough additional clearance for it to slide on easily, you will find it in the files as the "slim" version.
On request, I've created and uploaded a split top cover for the 38mm fan version to suit 220mm2 build plates.
Update: 6/01/2026
I've uploaded a new fan mount and matching super static pressure booster, I spent a few days testing this setup, and it offers the best cooling possible for a single fan.
Update: 4/01/2026
I have uploaded the following new front case versions:
Front Case With - USB - Logo - Switch - 38mm Fan
Front Case With - USB - No Logo - Switch - 38mm Fan
Front Case With - USB - No Logo - No Switch - 38mm Fan
Front Case With - USB - No Logo - Switch
Front Case With - USB - No Logo - No Switch
I've just uploaded a new vertical stand that is compatible with a 220mm2 build plate, as the existing one was too large.
I've uploaded new static pressure boosters, the standard has improved flow and geometry, the other has improved pressure capacity but will require a good fan like the recommend P12 Pro CO by Arctic, testing done with Furmark VK 10m runs, with no static booster, the GPU throttles quickly over a few minutes down to 1850mhz and sits at 90C, with the standard pressure booster, it sits at 1950mhz after about 4 to 5 mins, and with the super pressure booster, it holds at 2050mhz for the entire 10m run.
Update: 2/1/2026
I have uploaded a new more simplified fan mount, I've added some clearance to make it easier to install so its not so tight, and I have increased the static pressure booster, please provide feed back on fitment.
Update: 28/12/2025
I have now updated and added all flavours of the front case, you can now have it with or without logo's with or without the switch, I have also updated the USB Hub front case, but these only come with the Logo and Illuminated Logo at the moment, I may do a non logo version, but I will take a rest for a day so I can go play ARC Raiders on my Steam Machine :)
Below are some Photos of the USB front case:
Update: 27/12/2025
I have uploaded several new front case sections, 1 is an updated version of the Logo with power switch, the other 2 are in a folder called WIP as they are still experimental, both add support for the Anker 4 port USB HUB, this hub can be configured for external use, or internal use, one of these front cases also has the logos passing into the inside, so you can add led back lights to illuminate the Logo's and Accent.
Compatible USB Hub: Anker 4 Port USB 3 Hub
Update: 23/12/2025
Added a new mount for the LOP-300-12 Meanwell PSU, this will now accept 2 x 4010 or 4020 cooling fans:
Update: 22/12/2025
I have uploaded new versions of the top and bottom split hex covers for 220mm2 build plates, these are now similar to the 300m2 ones and have been designed to reduce material required, and will help reduce fan noise at higher speeds, please print these with outer side facing down onto the bed.
Update: 20/12/2025
I've added some new photos, and included a customary banana in one for sizing as this is apparently a standard internet rule of measurement.
Here are some comparison photos with the PS5, my machine is smaller, similar weight, and much easier to disassemble to clean out the dust, and if anyone has done this job properly on a PS5, then you will know what a pain in the backside it is to do.
Update: 14/12/2025
Uploaded new top and bottom hex mesh covers for the 300x300 bed, these have been hollowed out to reduce material requirements, and increased the gap between the fan intake, this helps reduce fan noise created at higher speeds.
Uploaded new side hex panels and optional vertical stand, these now require less material to print.
I've added a version requested by users in the Discord for a version to suit 38mm Thick server class fans, the fan is exposed on this one, so you will need supply your own grill, and its recommend as those are finger chopper fans, you will only need the custom front and rear case, and the top cover, all other components are standard.
Update: 13/12/2025
Added an optional front case with a power switch to toggle the PWR_ON of the power supply.
Link to the switch: 16mm Latching Switch 12v with White LED
There is many switches from many sellers that are exactly the same, and many colours available, just confirm the dimensions match:
Some renders:
Some actuals:
Update: 11/12/2025
I have created a Github Repo with scripts to run once you have installed Bazzite, these will optimise you BC-250 for gaming use, I will be adding more information to this repo very soon.
I have enough photos and videos now to produce a YouTube assembly guide, during the festive holidays I will create these along with a guide to install Bazzite from either Windows or Linux and some benchmarks and small gaming runs so you can see the expected performance.
Updated the benchmark images with the latest ones, at the bottom of this page.
Update: 6/12/2025
I have added some benchmarks to the very bottom of this thread if you re interested in its thermal performance.
I have added an alternative mount for a low cost power supply solution, the Meanwell LOP-300-12, this appears to be a solid little compact power supply, and is a good option for those that cant buy a Flex ATX power supply at a good price, you will need a small 40mm x 10mm 12v cooling fan for it, you just mount up the powersupply and load it into the case in the same position as the Flex ATX one.
Link to the Meanwell LOP-300 Data Sheet: https://www.meanwell.com/webapp/product/search.aspx?prod=LOP-300
Purchase Link: Meanwell LOP-300-12
Update: 5/12/2025
I have now added a top and bottom split hex covers that can be printed on a 220x220 bed, there is some locking keys that you need to use to secure the 2 halves together, maybe use some Superglue (Crazyglue) to bind them, and there is 2 more M3 x 8 to 12mm and threaded inserts required by each top and bottom hex panel.
I will not be printing these split covers, so I will require feedback if there is an issue, I suggest if the keys are too tight, then reprint them at 99% size.
Front and rear case sections have been updated to support the split hex covers as well
Update: 3/12/2025
I have done some additional testing, overclocking, undervolting and fan configuration, and I now recommend opening the full fin stack to allow for more airflow, fan to be blowing inwards on the fin stack, and I have updated the fan mount and included a static pressure booster as this cooler produces considerable amount of back pressure, see below image for correct orientation, this will yield the best cooling and a very low noise level.
Update: 2/12/2025
After a quick test, the Amazon Fire TV Remote pairs up and works perfect in Bazzite, operates Jellyfin Media Player perfectly, just hold down the home button for 5 seconds and pair it via bluetooth.
Link to the custom Governor I use to overclock the GPU: https://github.com/filippor/cyan-skillfish-governor/tree/throttling
Link to a helpful guide: https://elektricm.github.io/amd-bc250-docs
PC gaming has been a passion of mine since the days of the Commodore 64, I’ve owned and built many machines, I've always had a PC in my Living-Room and I love gaming on the couch, I also jumped on board and purchased one of the OG Steam Machines built by Alienware (Alpha).
Now after experience the magic of the Steam Deck and gaming on custom PC’s using my new favourite, Bazzite an immutable image based on Fedora Kinonite, I’m 100% sold on this, so I thought I would get behind a small movement to re-purpose some defunct hardware into a fully operational, low cost Steam Machine’s, that not only performs good, but looks great too.
This machine uses the AMD BC-250 board, these are fitted with slightly cutdown PS5 APU’s that were repurposed as blade like mining rigs, so we are re-puposing something that was re-purposed :)
Information on the BC-250: https://github.com/mothenjoyer69/bc250-documentation
Basic Specs:
CPU = 6 x Zen 2 Cores with SMT
GPU = 24 RDNA 2 CU’s
Ram = 16GB of GDDR6 Shared Between System and GPU, very much like the Steam Deck and others like the Lenovo Legond Go with the Z1 Extreme (8 CPU Cores and 12 RDNA CU’s)
So this makes it a very nice little performer for the money, its like a Steam Deck APU on steroids, or another way to look at it, its 1080/1440p version of the Steam Deck APU, and will handle any Game that runs under Linux at 1080P Medium to High Settings at over 60fps.
Also do not skimp out on the fan, use the ones I have linked to and full tested in my design, avoid the standard Arctic P12, it lacks the performance required, you will want the P12 Pro or the P12 Max, if you use some other fan, well, your results may vary.
After many weeks of thermal testing, bench marking and testing designs, fan types and fan orientation, I found the blowing into the case using a static pressure booster and a strong fan like the P12 Pro CO from Arctic was the best choice and has resulted in a machine that can be fully overclocked and has the capacity to easily dissipate 350w of power.
The cooling system on this open source game console, uses the exact same principles as the Steam Deck, and the upcoming Steam Machine, the entire system is cooled with a single fan, pulling air in through the bottom of the case, and over all of the hot parts, then venting out the top, I have taken inspiration from the team at valve, and I have designed this in a way, that makes it hard to block inlet, and outlet venting, you would need to wrap it in clingwrap like some sort of Bad Boy Bubby freak to “choke out” the cooling system :)
I highly recommend printing from anything other than PLA, please avoid this terrible material, and print from, at a minimum, PETG, preferably PETG with Glass Fibre or Carbon Fibre, as it will make a substantially better looking device, glossy looking coloured plastic looks tacky, and the layer lines show due to reflecting light, matte finished material looks considerably better, specially if you plan on showcasing this in your living room, and for me, it has passed WAF (For the younger folks, that's "Wife Approval Factor") and this can be quite important in some households.
I have printed mine in the following materials:
Fan Mount:
Upper and Lower Gaskets = TPU
Mount Mount: PC-CF
Casing:
Front in dual colour: PETG-CF and Logos done in Matte White PETG-GF
Rear: PETG-CF
Hex Mesh Trims and Optional Vertical Stand:
All done in: Matte White PETG-GF
Feet:
Printed 4 of these in: White TPU
The Fan mount might be okay in PETG-GF or CF, but I would recommend ABS at a minimum as the heat sink can get fairly hot if you have the fan running at a lower speed.
All of the threaded inserts can be installed without any heat, just fit them like a nut on the inside and use the socket head M3 bolt to pull them into the seat I have modelled into the casing, very simple and easy, if you have big chunky hands like me it can be a little fiddly on the rear part of the case, but if I can do it, then I think almost anyone can do it.
I’m currently putting together a video on assembling this, and I will have additional videos showing how to install and setup Bazzite, then a bunch of videos showing benchmarks and gaming performance on many Steam titles.
At the moment, you will need a 300mm x 300mm Bed to print this, but in the coming days I will upload a modified version that will print on a 220mm x 220mm Bed, along with version that you can screw into the plastic instead of nice threaded inserts, and a special request in the Discord for a version to take a 38mm 10k Rpm Server fan.
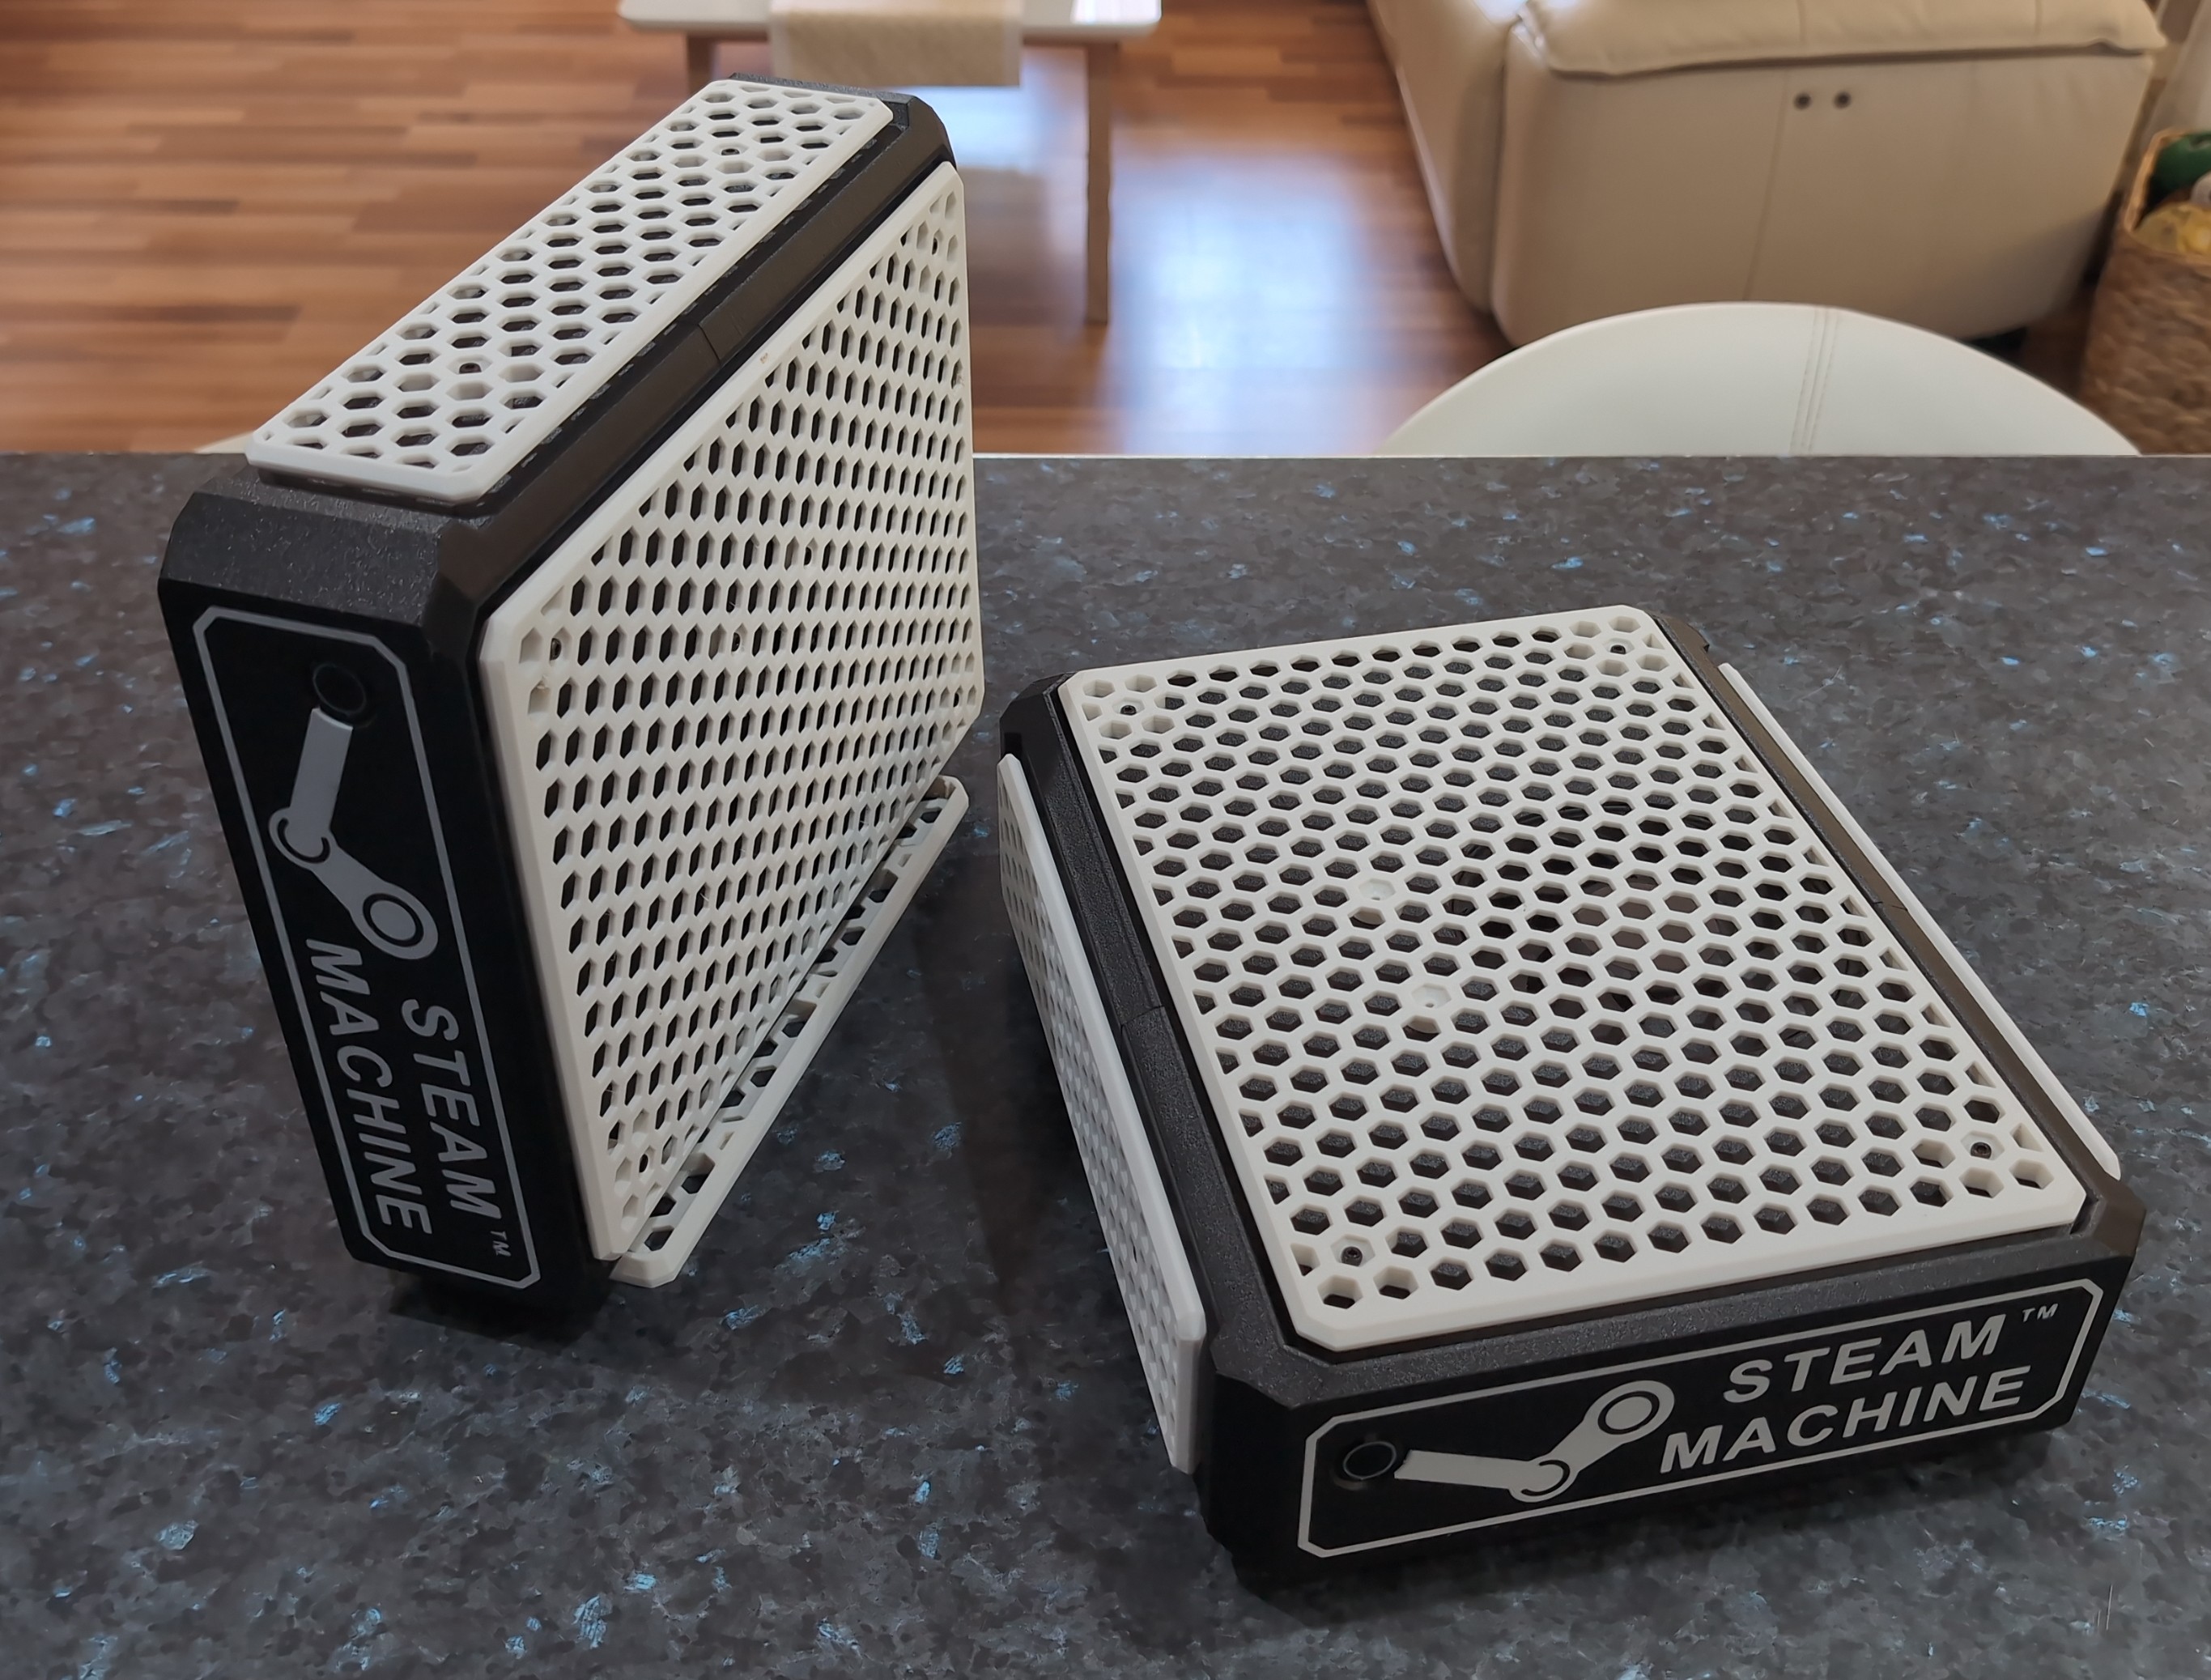
Some photos of the finished product, this is in the horizontal position:
This is in the vertical position with the optional vertical stand:
Here is a shot in its natural habitat:
Latest benchmarks for the BC-250 running in my case under Bazzite:
Link to my Bazzite forum thread: https://universal-blue.discourse.group/t/i-just-created-the-bazzite-box-low-cost-steam-machine/11182/6
Printing Orientation:
Fan mount and static pressure booster
300mm3 or larger beds
220mm3 beds
This are is where I will post images and guides on how to do certain things:
How to install the threaded inserts:
Opening up the cooler, my recommendation is to use a pair of scissors, just mid sized ones will do, the trip is to be patient, and no rush it, you are not cutting, but its more like peeling, the folded part is quite weak, so once it starts peeling it comes away quite easily, the trick, is to do it from the IO side of the board all the way across, this is due to the way the blade is profiled on scissors and the way the finstack top is folded over, please see the following photos;
As you can see, I use a piece of plastic to support a bladed and the other peels the top away, you just work you way across, from the IO side of the board to the other, one at a time, you can use a small cutting board as a brace or some wood, I decided to use the vertical stand for the case :)
As you can see here, it looks extremely neat and tidy, much better than trying to bend them in or out.
Wiring diagram for the latching Press Button Switch:
In some cases the NO/C/NC wiring colours can vary, so just check on the back of the switch itself as its inscribed on there, so just check before connecting.
Switch Wire Code:
Green = Common (C) - Goes to Ground on the 24 Pin Plug
Blue = Normally Open (NO) - Goes to the PS_ON on the 24 Pin Plug.
Yellow = Normally Closed (NC) - This is not used
Red = 12v - Power for the LED Ring - Red goes to 12v on the 24 Pin Plug.
Black - Ground - Power for the LED Ring - Goes to Ground on the 24 Pin Plug
Wiring Into The 24 Pin Plug:
Easiest way to do this is to just tap in, solder and tape with some electrical tape, if you cant solder, then just twist and tape.
My recommend insulation tap is this awesome PET based tape from Tesa: Flame Retardant PET 51036 Tape
Below images show the easiest way to strip and tap in
Preparing the Board:
You must remove the IO Shield and small mounting bracket before install the board in the case, as these are not required.
Removing the Heatsink:
If you want to replace the TIM, I highly recommend PTM7950 and Thermal Putty for the VRAM Modules, along with new 1.5mm thick pads for the VRM's, there is just 8 simple screws to remove, the centre 4 are the ones that clamp the heat sink down to the APU, and the 4 outer ones clamp the the heatsink down to the VRM's and secure the back plate:
And it should look like this once done:
Pin out details for the FSP500-30AS Power Supply:
Stay tuned for more images.......
If you would like to ask me question or discuss the project, please feel free to make contact with me on the Bazzite forum: Bazzite Forum Post
NexGen3D: DIY Steam Machine Powered By Bazzite
by NexGen-3D-Printing · original on Printables ↗
Gadgets / Computers
♥ 384⬇ 4.2k🖨 22 prints
Print profiles
TPU Foot x 4.3mf
⏱ time and weight estimated after preparation · 1 material(s)
Made to order: we prepare this file when you order, which adds a few minutes before printing starts.
Prints on: A1 mini 0.4PLA
Order this print
Steam Machine - (Not for printing).3mfDEFAULT
⏱ time and weight estimated after preparation · 1 material(s)
Made to order: we prepare this file when you order, which adds a few minutes before printing starts.
Prints on: A1 mini 0.4PLA
Order this print
Bottom Cover - Hex.3mf
⏱ time and weight estimated after preparation · 1 material(s)
Made to order: we prepare this file when you order, which adds a few minutes before printing starts.
Prints on: A1 mini 0.4PLA
Order this print
Top Cover - Hex.3mf
⏱ time and weight estimated after preparation · 1 material(s)
Made to order: we prepare this file when you order, which adds a few minutes before printing starts.
Prints on: A1 mini 0.4PLA
Order this print
Top Cover - 38mm Fan.3mf
⏱ time and weight estimated after preparation · 1 material(s)
Made to order: we prepare this file when you order, which adds a few minutes before printing starts.
Prints on: A1 mini 0.4PLA
Order this print
LH-RH Side Cover - Hex.3mf
⏱ time and weight estimated after preparation · 1 material(s)
Made to order: we prepare this file when you order, which adds a few minutes before printing starts.
Prints on: A1 mini 0.4PLA
Order this print
Locking Key 1.3mf
⏱ time and weight estimated after preparation · 1 material(s)
Made to order: we prepare this file when you order, which adds a few minutes before printing starts.
Prints on: A1 mini 0.4PLA
Order this print
Locking Key 2.3mf
⏱ time and weight estimated after preparation · 1 material(s)
Made to order: we prepare this file when you order, which adds a few minutes before printing starts.
Prints on: A1 mini 0.4PLA
Order this print
Bottom Cover 2.3mf
⏱ time and weight estimated after preparation · 1 material(s)
Made to order: we prepare this file when you order, which adds a few minutes before printing starts.
Prints on: A1 mini 0.4PLA
Order this print
Bottom Cover 1.3mf
⏱ time and weight estimated after preparation · 1 material(s)
Made to order: we prepare this file when you order, which adds a few minutes before printing starts.
Prints on: A1 mini 0.4PLA
Order this print
Top Cover 2.3mf
⏱ time and weight estimated after preparation · 1 material(s)
Made to order: we prepare this file when you order, which adds a few minutes before printing starts.
Prints on: A1 mini 0.4PLA
Order this print
Top Cover 1.3mf
⏱ time and weight estimated after preparation · 1 material(s)
Made to order: we prepare this file when you order, which adds a few minutes before printing starts.
Prints on: A1 mini 0.4PLA
Order this print
LOP-300-12-v2.3mf
⏱ time and weight estimated after preparation · 1 material(s)
Made to order: we prepare this file when you order, which adds a few minutes before printing starts.
Prints on: A1 mini 0.4PLA
Order this print
USB Cover - Hex.3mf
⏱ time and weight estimated after preparation · 1 material(s)
Made to order: we prepare this file when you order, which adds a few minutes before printing starts.
Prints on: A1 mini 0.4PLA
Order this print
Optional Vertical Foot.3mf
⏱ time and weight estimated after preparation · 1 material(s)
Made to order: we prepare this file when you order, which adds a few minutes before printing starts.
Prints on: A1 mini 0.4PLA
Order this print
Split Top Cover 38mm 2.3mf
⏱ time and weight estimated after preparation · 1 material(s)
Made to order: we prepare this file when you order, which adds a few minutes before printing starts.
Prints on: A1 mini 0.4PLA
Order this print
Split Top Cover 38mm 1.3mf
⏱ time and weight estimated after preparation · 1 material(s)
Made to order: we prepare this file when you order, which adds a few minutes before printing starts.
Prints on: A1 mini 0.4PLA
Order this print
LOP-300-Plug.3mf
⏱ time and weight estimated after preparation · 1 material(s)
Made to order: we prepare this file when you order, which adds a few minutes before printing starts.
Prints on: A1 mini 0.4PLA
Order this print
Static Pressure Booster.3mf
⏱ time and weight estimated after preparation · 1 material(s)
Made to order: we prepare this file when you order, which adds a few minutes before printing starts.
Prints on: A1 mini 0.4PLA
Order this print
Case Rear - V3.3mf
⏱ time and weight estimated after preparation · 1 material(s)
Made to order: we prepare this file when you order, which adds a few minutes before printing starts.
Prints on: A1 mini 0.4PLA
Order this print
Case Front - USB - No Logo - Switch - V3.3mf
⏱ time and weight estimated after preparation · 1 material(s)
Made to order: we prepare this file when you order, which adds a few minutes before printing starts.
Prints on: A1 mini 0.4PLA
Order this print
Simple Accent.3mf
⏱ time and weight estimated after preparation · 1 material(s)
Made to order: we prepare this file when you order, which adds a few minutes before printing starts.
Prints on: A1 mini 0.4PLA
Order this print
BC-250 Logo.3mf
⏱ time and weight estimated after preparation · 1 material(s)
Made to order: we prepare this file when you order, which adds a few minutes before printing starts.
Prints on: A1 mini 0.4PLA
Order this print
Bazzite Logo.3mf
⏱ time and weight estimated after preparation · 1 material(s)
Made to order: we prepare this file when you order, which adds a few minutes before printing starts.
Prints on: A1 mini 0.4PLA
Order this print
Case Front - No USB - No Logo - No Switch.3mf
⏱ time and weight estimated after preparation · 1 material(s)
Made to order: we prepare this file when you order, which adds a few minutes before printing starts.
Prints on: A1 mini 0.4PLA
Order this print
Case Rear - 38mm.3mf
⏱ time and weight estimated after preparation · 1 material(s)
Made to order: we prepare this file when you order, which adds a few minutes before printing starts.
Prints on: A1 mini 0.4PLA
Order this print
Case Front - USB - No Logo - Switch - 38mm.3mf
⏱ time and weight estimated after preparation · 1 material(s)
Made to order: we prepare this file when you order, which adds a few minutes before printing starts.
Prints on: A1 mini 0.4PLA
Order this print
Case Front - Blank - 38mm.3mf
⏱ time and weight estimated after preparation · 1 material(s)
Made to order: we prepare this file when you order, which adds a few minutes before printing starts.
Prints on: A1 mini 0.4PLA
Order this print
Simple Accent - 38mm.3mf
⏱ time and weight estimated after preparation · 1 material(s)
Made to order: we prepare this file when you order, which adds a few minutes before printing starts.
Prints on: A1 mini 0.4PLA
Order this print
BC-250 Logo - 38mm.3mf
⏱ time and weight estimated after preparation · 1 material(s)
Made to order: we prepare this file when you order, which adds a few minutes before printing starts.
Prints on: A1 mini 0.4PLA
Order this print
Case Front - USB - Logo - Switch - 38mm.3mf
⏱ time and weight estimated after preparation · 1 material(s)
Made to order: we prepare this file when you order, which adds a few minutes before printing starts.
Prints on: A1 mini 0.4PLA
Order this print
Bazzite Logo - 38mm.3mf
⏱ time and weight estimated after preparation · 1 material(s)
Made to order: we prepare this file when you order, which adds a few minutes before printing starts.
Prints on: A1 mini 0.4PLA
Order this print
Case Front - No USB - No Logo - Switch - 38mm.3mf
⏱ time and weight estimated after preparation · 1 material(s)
Made to order: we prepare this file when you order, which adds a few minutes before printing starts.
Prints on: A1 mini 0.4PLA
Order this print
Case Front - No USB- No Logo - Switch.3mf
⏱ time and weight estimated after preparation · 1 material(s)
Made to order: we prepare this file when you order, which adds a few minutes before printing starts.
Prints on: A1 mini 0.4PLA
Order this print
LOP-300-400-500-600-Plug.3mf
⏱ time and weight estimated after preparation · 1 material(s)
Made to order: we prepare this file when you order, which adds a few minutes before printing starts.
Prints on: A1 mini 0.4PLA
Order this print
Case Front USB - No Logo - No Switch.3mf
⏱ time and weight estimated after preparation · 1 material(s)
Made to order: we prepare this file when you order, which adds a few minutes before printing starts.
Prints on: A1 mini 0.4PLA
Order this print
Case Rear - 180 USB.3mf
⏱ time and weight estimated after preparation · 1 material(s)
Made to order: we prepare this file when you order, which adds a few minutes before printing starts.
Prints on: A1 mini 0.4PLA
Order this print
Blank Insert.3mf
⏱ time and weight estimated after preparation · 1 material(s)
Made to order: we prepare this file when you order, which adds a few minutes before printing starts.
Prints on: A1 mini 0.4PLA
Order this print
Case Rear - 180 USB - Server PSU.3mf
⏱ time and weight estimated after preparation · 1 material(s)
Made to order: we prepare this file when you order, which adds a few minutes before printing starts.
Prints on: A1 mini 0.4PLA
Order this print
Case Front - Steam Logo - USB - Switch - V3.3mf
⏱ time and weight estimated after preparation · 1 material(s)
Made to order: we prepare this file when you order, which adds a few minutes before printing starts.
Prints on: A1 mini 0.4PLA
Order this print
Fan Mount.3mf
⏱ time and weight estimated after preparation · 1 material(s)
Made to order: we prepare this file when you order, which adds a few minutes before printing starts.
Prints on: A1 mini 0.4PLA
Order this print