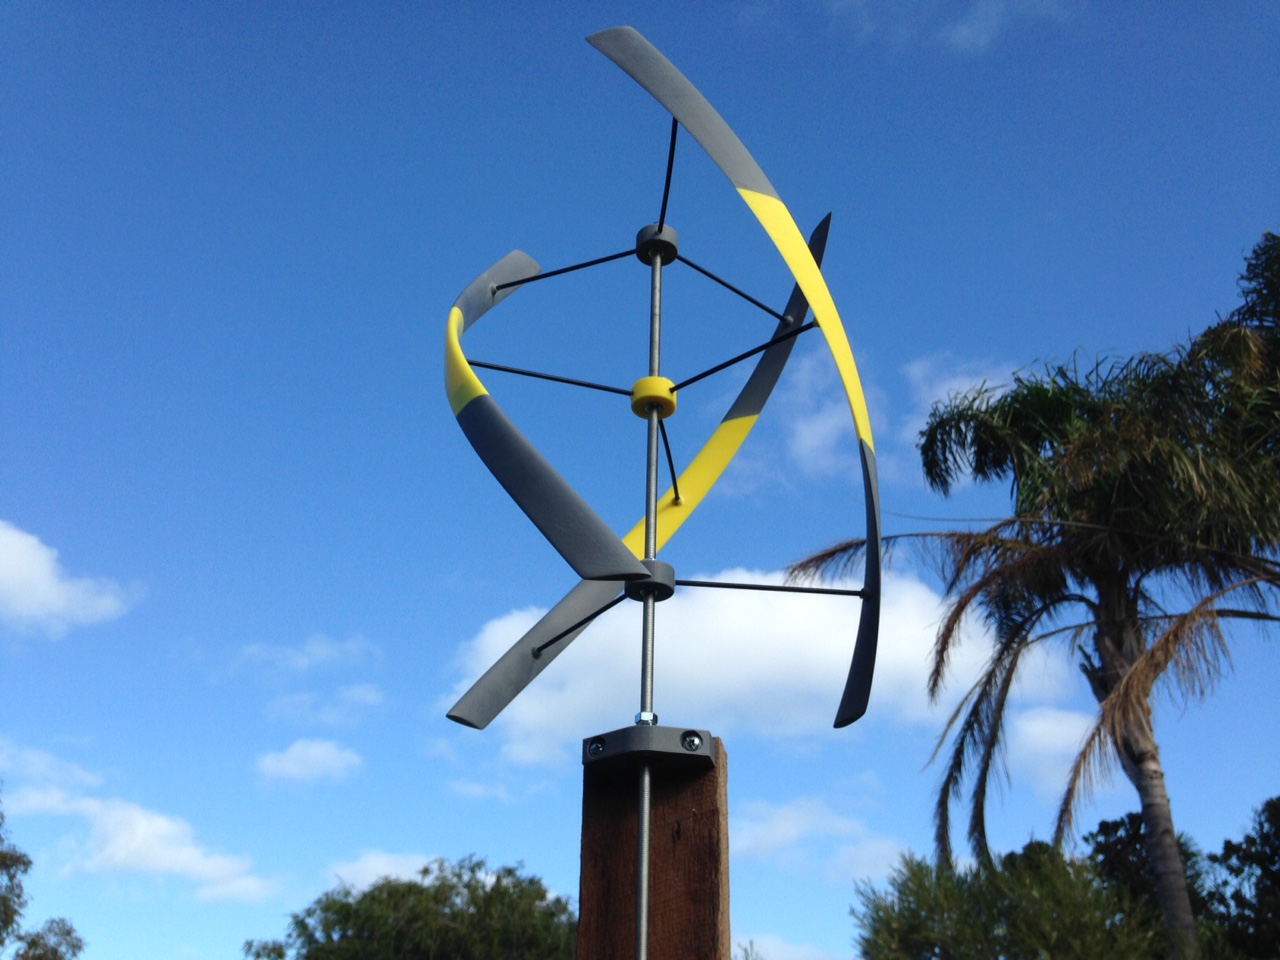
Here's my 'Mk2' Vertical Axis Wind Turbine (VAWT). I've always liked the lines of these, but they really caught my attention a few weeks ago when I realised that I couldn't explain how they work.
I'm now a lot less confused about how a wing works (really good explanation here if you're interested: How Airfoils Work, and I've learned a few new tricks with the printer.
When I printed this, I had visions of hooking it up to a little water pump. I think that might have worked, but in the end, it made a pretty moving sculpture, so I just left it somewhere I could look at it :)
Changes from Mk1
Mk1 was my "that looks about right" effort; it did spin, but only just and was pretty uply. This one is much nicer.
- The blades are now hollow, reducing filament use and weight, which in turn reduces the centrifugal force (yes; I know it's just inertia). This also eliminates tiny delaminations along the tail seen in Mk1.
- The blade is now made up of 'n' sections (3 in this print) that slot together. This allows for longer blades regardless of build area.
- The first version used pins to align the two halves (didn't work well). This version prints a socket on one side of the join that slots into the hollow section of the other piece.
- The blade is now connected to the central shaft via 'n' struts (3 in this case). This arrangement is much stronger than Mk1, where the joint was in the middle of the blade.
- By removing the base, the windmill's diameter can be as large as the struts allow. Combined with segmented blades, you can create a much larger version.
Ideas for Mk3
- Add a transverse web across the widest part of the blade to improve strength without adding much weight.
- Aim for a solidity ratio of 88% (i.e., 88% of the space is taken up by the blade). This would mean blades about double the size of this one.
- Develop a way to make the struts printable with a very strong connection to the blade.
Instructions
Push Fits
There are a few push fits in this design, so it may require tweaking depending on your printer. Print two of the JointTest pieces first and check the fit before printing more. If they're not a good fit, the .SCAD file is easy to modify. Let me know if you need help.
Printing
I found that print quality improved when printing three segments at once. A single segment doesn't get enough time for the first layer to cool before adding the second, which affects the large overhang.
Gluing
For gluing, I used **Loctite super glue (plastic adhesive)**, which created a strong bond with both the plastic and the carbon rods.
Make It Smooth
A rough finish significantly affects efficiency. Sand the blade to a smooth finish; the more time you spend on this, the better.
Axle
- For a **straight rod**, it should be a push fit through the mount. Use the cross-hole as a guide to drill a 3mm hole through the rod. Insert a 30mm M3 screw with a matching nut into the recess or drill a smaller hole and tap the M3 thread directly into the rod.
- For a **threaded rod**, insert an M8 nut into the recess and wind it down the rod. Use another nut to lock it in place.
The best way to assemble it is to set the spacing of the mounts before attaching the blades. The mounts should be 150mm apart on the rod.
Struts
I used carbon rods cut from an old golf umbrella (150mm long, 3.6mm diameter). Ensure a snug fit with the sockets by printing the JointTest piece first. If needed, adjust the SCAD file or drill it out.
Note: Be careful of carbon splinters--they're really nasty!
Ensure the struts are of equal length to maintain balance. Insert them with the axle already in place and push them in fully to ensure consistent blade offset.
Bearing Mounts
I printed 2 bearing mounts with 2 roller-blade bearings in each. Use 2xM8 nuts locked against each other above the top mount and below the bottom one to secure them.
The holes are sized for a 10g screw with a 6mm washer.
Installation
If you're looking at where to install it, I hope that means you've made one. If so, CONGRATULATIONS!!! and I'd love to see a photo.
Try to choose a site with ‘clean’ airflow, i.e. avoid areas where the wind will be stirred up by other trees, buildings, etc. I had mine above my roofline, which seemed to work pretty well.
---
Source
Source files
The model is created in OpenSCAD with and comprises:
- Turbine02.03.scad - All files for the turbine itself (read the comments at the beginning for instructions).
- BearingMount02.00.scad - A quick mount to suit an M8 threaded rod.
Don't hesitate to tinker with them to customize the blade shape or size. Start by adjusting these parameters:
- plug_os: Shrink the plug in from the blade's edge.
- strut_id: Inner diameter of the strut hole.
- blade_height: Overall height.
- num_segs: Number of segments (per blade) to print.
- chord_len: Blade length in mm.
- end_os: Distance from the blade tip for the top & bottom strut sockets.
- num_sockets: Total number of strut sockets.
Project Files
If I ever update this model, you can find it at my GitHub site.
I originally published this on Thingiverse (quite a while ago). If you're interested in other peoples' experiences, there's a bundle of comments over there.
Vertical Axis Wind Turbine (VAWT)
by miiiikeb · original on Printables ↗
Art & Design / Sculptures
♥ 366⬇ 3.1k🖨 0 prints
Print profiles
ThreadedMount02.stl
⏱ time and weight estimated after preparation · 1 material(s)
Made to order: we prepare this file when you order, which adds a few minutes before printing starts.
Prints on: A1 mini 0.4PLA
Order this print
mount02.00.stl
⏱ time and weight estimated after preparation · 1 material(s)
Made to order: we prepare this file when you order, which adds a few minutes before printing starts.
Prints on: A1 mini 0.4PLA
Order this print
BearingMount02.01.stl
⏱ time and weight estimated after preparation · 1 material(s)
Made to order: we prepare this file when you order, which adds a few minutes before printing starts.
Prints on: A1 mini 0.4PLA
Order this print
JointTest.stl
⏱ time and weight estimated after preparation · 1 material(s)
Made to order: we prepare this file when you order, which adds a few minutes before printing starts.
Prints on: A1 mini 0.4PLA
Order this print
SegNum3-02.stl
⏱ time and weight estimated after preparation · 1 material(s)
Made to order: we prepare this file when you order, which adds a few minutes before printing starts.
Prints on: A1 mini 0.4PLA
Order this print
SegNum1-02.stlDEFAULT
⏱ time and weight estimated after preparation · 1 material(s)
Made to order: we prepare this file when you order, which adds a few minutes before printing starts.
Prints on: A1 mini 0.4PLA
Order this print
SegNum2-02.stl
⏱ time and weight estimated after preparation · 1 material(s)
Made to order: we prepare this file when you order, which adds a few minutes before printing starts.
Prints on: A1 mini 0.4PLA
Order this print