Summary
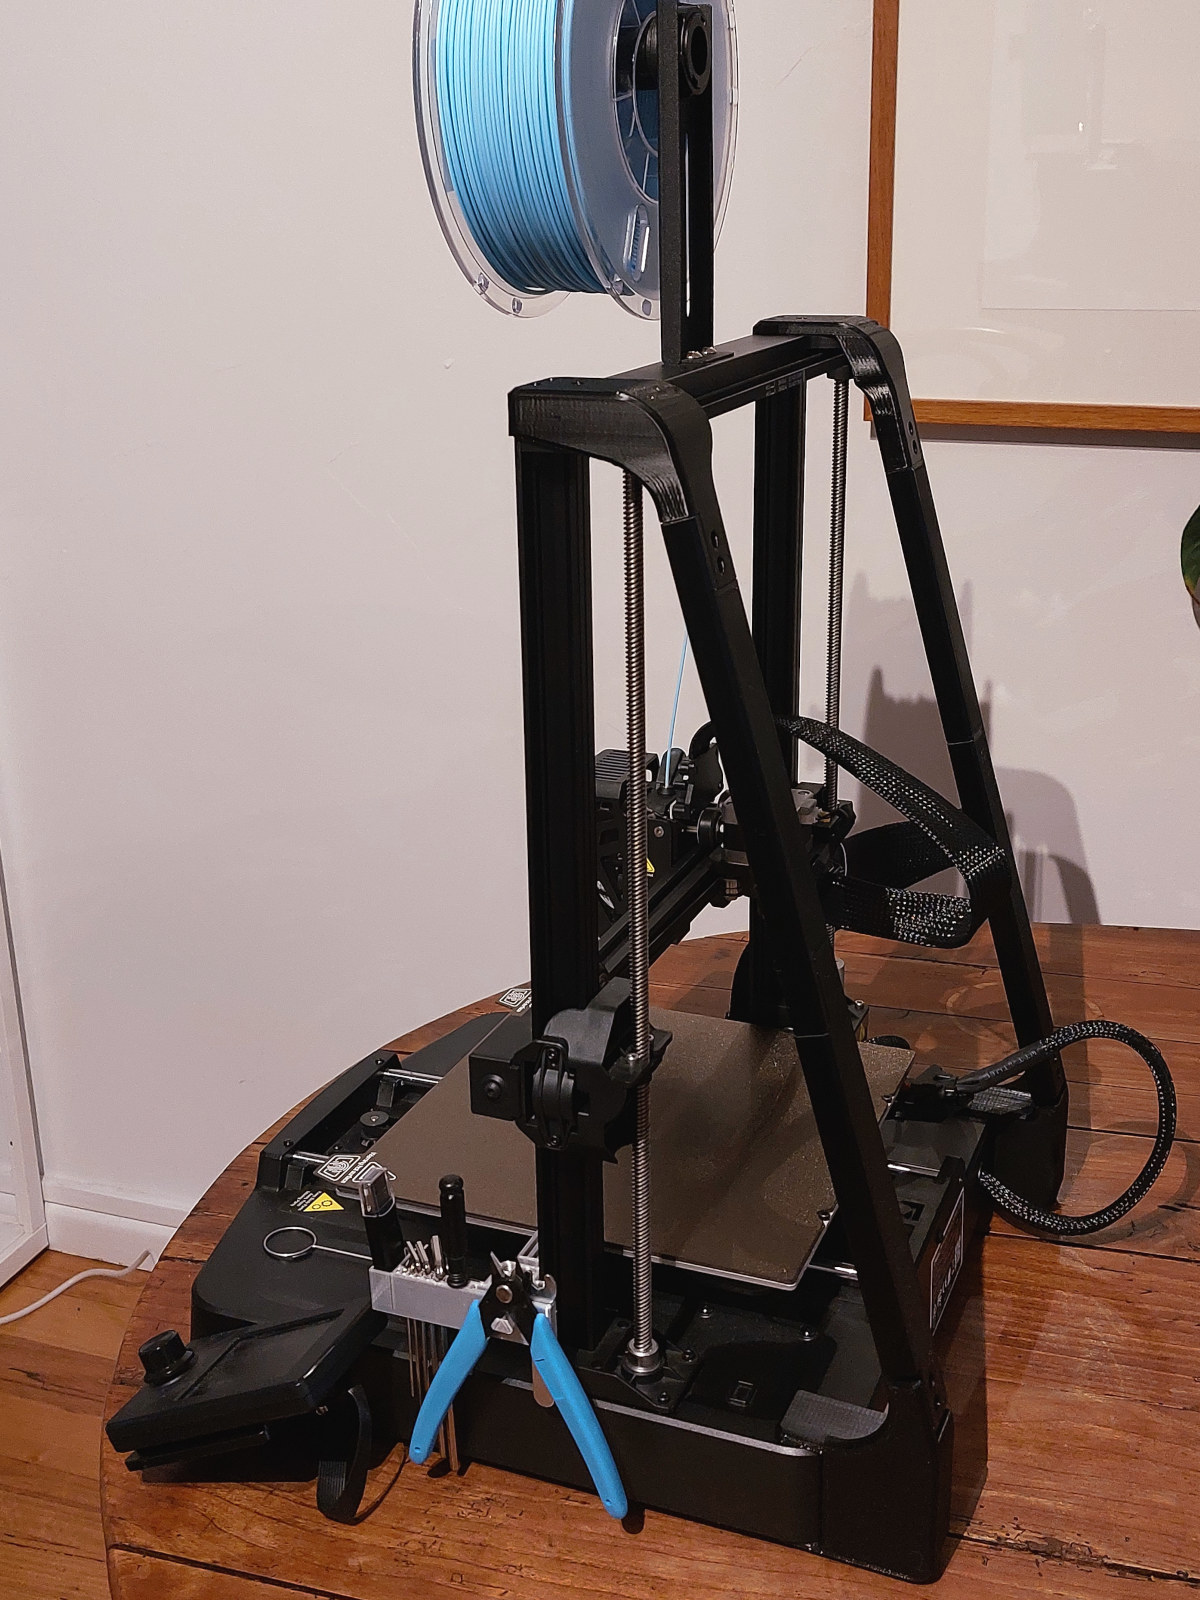
In an attempt to reduce ghosting on prints, especially evident when printing at high speed, I have design a fully printed gantry support.
The support mounts to the gantry and base using existing screws (no modification to the printer required).
The parts are split to allow printing on a 220 x 220mm bed, and requires 12 self-tapping screws to assemble.
If you have the Creality LED Light Bar, there are alternative Cap files that include mounting provisions.
Printing
I printed these parts with 0.2mm layer height, 4 walls, and 30% infill.
I printed in PETG, however PLA is also a great option as it is stiffer than PETG. For maximum stiffness a CF filament should be considered.
The Caps should be printed with support for the curved surface, due to overhang angle.
The Gap Fillers are optional, but highly recommended when gluing the parts together. These should be printed after all of the other parts have been installed, to confirm the gap.
Post-Printing
Parts Required
- 12x M3x10mm self tapping screws (or 4Gx9mm [4Gx3/8"] screws)
- Drill with 2.0mm drill bit
- Superglue (CA glue), or 2-part epoxy adhesive (optional but recommended)
Assembly
- Remove the three cap screws from each side of the gantry, and install the Caps using these screws.
- Glue the Foot parts to the Base parts.
- Remove the single screw from underneath the printer, and install the Bases with this screw. The Base parts should be a snug fit onto the printer.
- Assemble the arms onto the cap using the M3 self-tapping screws.
- To ensure a good fit, the holes need to be drilled into the Base parts to mount the arms. Use the 2.0mm drill to make pilot holes. Check that the gantry is straight before drilling these holes:
- Assemble the arms to the Base parts using the M3 self-tapping screws.
- Measure the gaps and print Gap Fillers to fill the space (use non-uniform scale and scale in the z-direction if you need to adjust the size of the part).
- Dis-assemble, then glue the Caps, Arms, Bases and Gap Fillers together with your preferred glue before finally installing them to the printer.
Results
I have completed a comparison print of the 20mm calibration cube.
I kept these variables the same:
- Printer
- G-code
- Filament (from same spool).
These items were changed:
- Checked and tightened all accessible screws.
- Upgrade the x-axis to a linear rail with this kit.
- Assembled the gantry support with 4mm gap fillers and bonded together with two-part epoxy, and installed to the printer.
Here are the results (Before on the top, after on the bottom):
I am happy with the improvement, as the ghosting is completely gone. I highly recommend the gantry support (and the x-axis linear rail upgrade for SE printers).
Ender 3 V3 SE / KE Gantry Support
by cheesmac · original on Printables ↗
3D Printers / Creality Parts & Upgrades
♥ 571⬇ 2.8k🖨 17 prints
Print profiles
Arm_LH.stl
⏱ time and weight estimated after preparation · 1 material(s)
Made to order: we prepare this file when you order, which adds a few minutes before printing starts.
Prints on: A1 mini 0.4PLA
Order this print
Arm_RH.stl
⏱ time and weight estimated after preparation · 1 material(s)
Made to order: we prepare this file when you order, which adds a few minutes before printing starts.
Prints on: A1 mini 0.4PLA
Order this print
Base_LH.stl
⏱ time and weight estimated after preparation · 1 material(s)
Made to order: we prepare this file when you order, which adds a few minutes before printing starts.
Prints on: A1 mini 0.4PLA
Order this print
Base_RH.stl
⏱ time and weight estimated after preparation · 1 material(s)
Made to order: we prepare this file when you order, which adds a few minutes before printing starts.
Prints on: A1 mini 0.4PLA
Order this print
Cap_LH.stlDEFAULT
⏱ time and weight estimated after preparation · 1 material(s)
Made to order: we prepare this file when you order, which adds a few minutes before printing starts.
Prints on: A1 mini 0.4PLA
Order this print
Cap_LH_Lightbar.stl
⏱ time and weight estimated after preparation · 1 material(s)
Made to order: we prepare this file when you order, which adds a few minutes before printing starts.
Prints on: A1 mini 0.4PLA
Order this print
Cap_RH.stl
⏱ time and weight estimated after preparation · 1 material(s)
Made to order: we prepare this file when you order, which adds a few minutes before printing starts.
Prints on: A1 mini 0.4PLA
Order this print
Cap_RH_Lightbar.stl
⏱ time and weight estimated after preparation · 1 material(s)
Made to order: we prepare this file when you order, which adds a few minutes before printing starts.
Prints on: A1 mini 0.4PLA
Order this print
Foot.stl
⏱ time and weight estimated after preparation · 1 material(s)
Made to order: we prepare this file when you order, which adds a few minutes before printing starts.
Prints on: A1 mini 0.4PLA
Order this print
Gap Filler_1.6mm.stl
⏱ time and weight estimated after preparation · 1 material(s)
Made to order: we prepare this file when you order, which adds a few minutes before printing starts.
Prints on: A1 mini 0.4PLA
Order this print
Gap Filler_3mm.stl
⏱ time and weight estimated after preparation · 1 material(s)
Made to order: we prepare this file when you order, which adds a few minutes before printing starts.
Prints on: A1 mini 0.4PLA
Order this print
Gap Filler_6mm.stl
⏱ time and weight estimated after preparation · 1 material(s)
Made to order: we prepare this file when you order, which adds a few minutes before printing starts.
Prints on: A1 mini 0.4PLA
Order this print