Introduction
When I decided to assemble my HomeLab Rack I wanted each device to have its own dedicated holder, as I like to keep everything tidy and wanted to avoid a mass of shelves. Unfortunately I couldn't find any satisfactory solution, so I decided to design my own modular solution that would allow multiple configurations.
The ESRack system includes components:
Mounting Brackets - used to install unit in the rack, available in 3 sizes:
Short
Medium
Long
Device Modules - each module can handle a single device
The original ESRack system was designed for 19-inch racks and allows multiple configurations:
- [Mounting Bracket Short] + [Module] + [Module] + [Mounting Bracket Short]
- [Mounting Bracket Medium] + [Module] + [Mounting Bracket Medium]
- [Mounting Bracket Short] + [Module] + [Mounting Bracket Long]
- [Mounting Bracket Long] + [Module] + [Mounting Bracket Short]
- [Mounting Bracket Long] + [Mounting Bracket Long] (Blank Front Plate)
All modules were designed with very little clearance to keep the whole assembly rigid and properly fitted. Some parts may need to be pushed together by force during assembly.
Before you start printing the original 19-inch system, print the Connecting Block to check that you will be able to connect the modules.
The ESRack system also supports 10-inch racks using dedicated adapter.
All parts of ESRack system can be found here.
If you like my work you can support me and Buy Me A Coffee ;)
Part Description
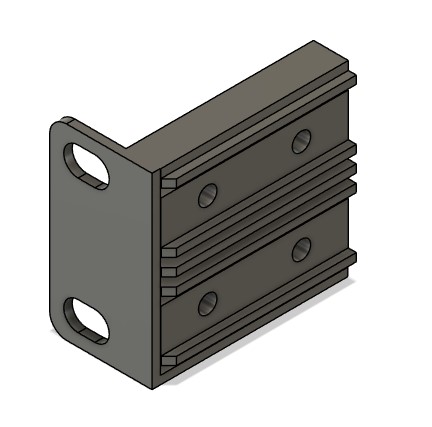
Mounting Bracket is the basic element of the Rack System. It's universal and after rotating can be used on the left and right side to install assembled unit in the Rack.
Some time ago I prepared a thicker and stronger version of Mounting Bracket and I strongly suggest to use it instead of this original part.
Suggested Print Settings
Material: PLA+/PETG (I used eSun PLA+)
Nozzle: 0.4 mm
Layer height: 0.2 mm
Wall loops: 3
Bottom shell layers: 5
Top shell layers: 3
Infill: +25%
Infill pattern: Gyroid
Orientation: Print on front surface
Support: Not needed when correct orientation is used
High infill is needed to avoid bending after installing equipment. I used 20% infill and with heavy equipment it's bend a bit.
Assembling
To connect the each individual modules together, you need:
- 4x M4 nuts (DIN934M4)
- 4x M4x12 allen screws (DIN912M4x12-8.8)
Use standard rack screws and nuts for rack mounting.
Changelog
2024-03-09 - Initial release
2024-08-06 - Update print settings
2024-09-24 - Rename from Rack System to ESRack
ESRack - Mounting Brackets
by EvilProphet · original on Printables ↗
Gadgets / Computers
♥ 148⬇ 1.7k🖨 9 prints
Print profiles
ESRack 1U - Mounting Bracket - Long.stl
⏱ time and weight estimated after preparation · 1 material(s)
Made to order: we prepare this file when you order, which adds a few minutes before printing starts.
Prints on: A1 mini 0.4PLA
Order this print
ESRack 1U - Mounting Bracket - Medium.stl
⏱ time and weight estimated after preparation · 1 material(s)
Made to order: we prepare this file when you order, which adds a few minutes before printing starts.
Prints on: A1 mini 0.4PLA
Order this print
ESRack 1U - Mounting Bracket - Short.stlDEFAULT
⏱ time and weight estimated after preparation · 1 material(s)
Made to order: we prepare this file when you order, which adds a few minutes before printing starts.
Prints on: A1 mini 0.4PLA
Order this print