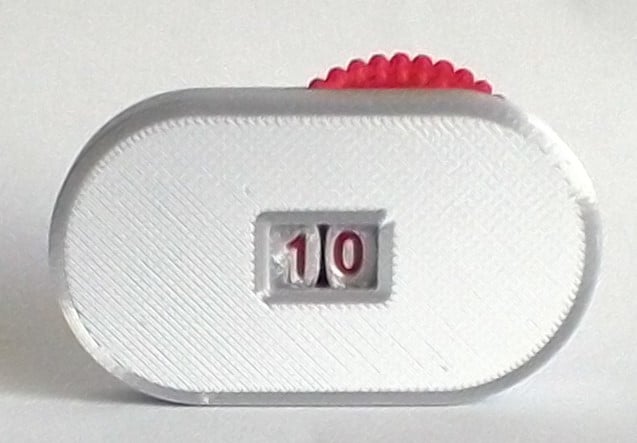
I needed a 2 digits counter
I found a few great ones on thingiverse but none fit my needs
I wanted one that is:
- easy to read (big numbers, bicolor numbers)
- easy to print
- easy to mount
- easy to operate
- has a carry mechanism
- is reliable (numbers dont move too easily from their position)
- is as small as possible
- looks good
- use only PLA (no screws, springs, magnets)
After many, many hours and trials (see last photo) I came to this one.
The counter case is much bigger than the numbers, too much for my taste, but I couldnt find any solution to have big readable numbers AND a small case. I made the case as small as possible with the constrains above.
Print Settings
Printer:
artillery genius
Rafts:
No
Resolution:
0.2
Filament:
Notes:
Slicing
Designed for 0.2 mm layers and 0.4 noozle.
Sliced with CURA 5.1
caseB17 and unitsA17 must be sliced with "normal" supports, "everywhere"
others dont need supports
check ‘monotonic top/bottom order’ to get a perfectly uniform outer case surface.
Printing
unitsA and tensA can be printed in the same batch, in 2 colors: start with one color (eg: white), pause just before layer 5 starts (=1mm height), change filament to a contrasted color (eg: black) and finish the print. This way the numbers will appear in black on a white background, so very readable.
caseA and caseB can be printed in the same batch, same color.
unitsB can be printed in another color to contrast with the case color.
Total printing time: a bit more than 2h.
Assembly
Remove supports. Be careful not to break the slit of caseB while doing this.
insert wheel unitsB in caseB. Push unitsB carefully inside the slit, not to break caseB (it is ok).
Move a little bit the springs (the rounded bars) of caseA (in case they are stuck to the case)
Insert the wheels unitsA and tensA in caseA, numbers face down, the spring pressing them. Make sure the wheels can turn and click in the positions defined by the springs.
Assemble caseA to caseB, so that the gear of unitsB goes nicely inside the gear of unitsA.
When the case is properly closed, you can pull the wheel and the units will change. The first time it will be a bit rough for each number, but after going through tthe whole range a few times, operation will be quite smooth.
You can go both directions, count up or count down, and the tens numbers will change when needed.
I have printed 10 of them, with different PLA colors and brands, always worked fine.
Make sure you leave the counter in a "clicked position" (the 2 numbers properly aligned with their window), otherwise the springs will become loose.
I've used so many models from thingiverse, I thought it was about time to give back something to the community. So I hope this counter can some day be useful to someone.
Category: Hand Tools
counter
by JMV38 · original on Printables ↗
Hobby & Makers / Tools
♥ 219⬇ 899🖨 23 prints
Print profiles
caseB17.stlDEFAULT
⏱ time and weight estimated after preparation · 1 material(s)
Made to order: we prepare this file when you order, which adds a few minutes before printing starts.
Prints on: A1 mini 0.4PLA
Order this print
unitA17c.stl
⏱ time and weight estimated after preparation · 1 material(s)
Made to order: we prepare this file when you order, which adds a few minutes before printing starts.
Prints on: A1 mini 0.4PLA
Order this print
tensA17c.stl
⏱ time and weight estimated after preparation · 1 material(s)
Made to order: we prepare this file when you order, which adds a few minutes before printing starts.
Prints on: A1 mini 0.4PLA
Order this print
caseA17.stl
⏱ time and weight estimated after preparation · 1 material(s)
Made to order: we prepare this file when you order, which adds a few minutes before printing starts.
Prints on: A1 mini 0.4PLA
Order this print
unitB17.stl
⏱ time and weight estimated after preparation · 1 material(s)
Made to order: we prepare this file when you order, which adds a few minutes before printing starts.
Prints on: A1 mini 0.4PLA
Order this print