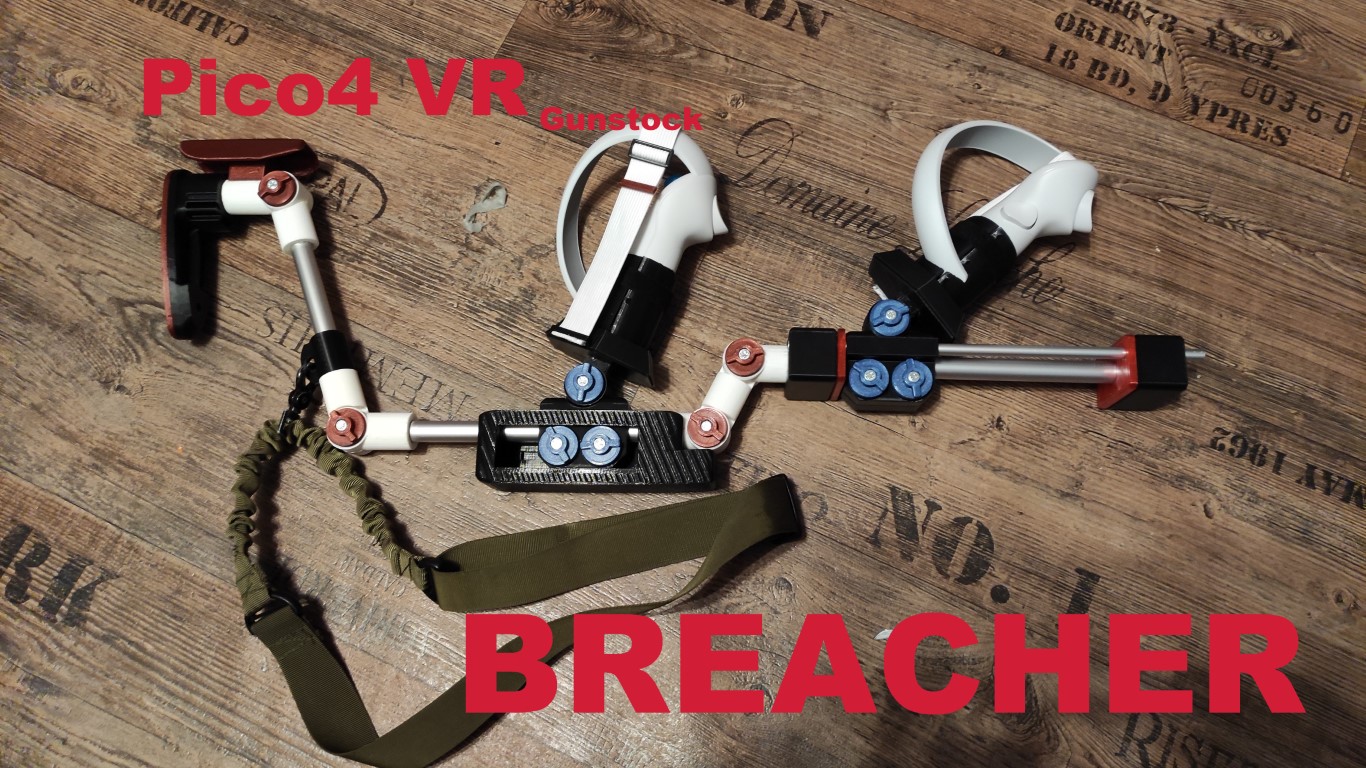
WARNING if you glue in the hexa cup magnets make sure both magnets are physically attached to each other before you apply glue inside the recess and lovering the the top controller holder onto the base. DONT glue the magnets into both sides while they are separated, this can cause an airgap in between the mangets when the controller holder is attached to the base which will result in weak holding force!!!!
UPDATE 11.11.2022
I added 2 Parts of which one needs to be glued on the base of the hexa cubs for the elastic controller strap, so you have the same safety feature and comfort an index controller would give you.
UPDATE 08.11.2022
I added “Breach_Controller_Frontcups_TPU” If you can print TPU, go for it as it grips the controllers much better and also the Velcro strap locks them in place much better as they are flexible. print with 40%infill.
UPDATE 07.11.2022
I added a “magazine bumper” as additional part. With VR gunstocks when you change magazine you of course try not to have physical contact with the stock as that would mean hitting your VR controller against the hard plastic or metal rails.
So you pretty much magically contactless insert the magazine or reload those shotgun shells. I like Feedback, so I added the magazine bumper. Printed in TPU and only 10% infill you now can “slam” your controller gently against the underside of your stock without having to fear to scuff up your controller ;)
UPDATE 05.11.2022
Go for the HEXA lock plates for both controllers, its just so much easier and better ;)
Just had the time of my life in Onward, its lovely to play with a gunstock!
UPDATE 04.11.2022
Now you can decide if you want to go with the original magnetic locking plate or the new HEXA. The original mechanism works but needs pretty good muscle memory to slot it in in one go. The HEXA has a bigger footprint but is way easier and faster to lock in.
Parts you need:
1 roll of Elastic fabric band with a diameter of 25mm ( if you want that comfort/safety feature. Of course you can also use Velcro band or whatever you prefer)
6x 35mm M5 hex head screws
4x 40mm M5 hex head screw ( 2x 40mm and 2x45mm M5 hex head screw if you want to use the magazine bumper)
10x M5 nuts
4x M5 washers
1x 25x15mm aluminium pipe (buttstock connector)
1x 200x15mm aluminum pipe
1x145x15mm aluminum pipe
1x 250x15mm aluminum pipe
2x 255x8mm aluminum pipe
(optional) 6x3mm magnets for the lower part of the controller cups:
https://www.amazon.de/-/en/gp/product/B081PXHM1B/ref=ppx_yo_dt_b_search_asin_image?ie=UTF8&psc=1
4/8 x 30x5 round neodymium magnet with screw hole( depending on if you go for the original locking plate or the new HEXA System)
https://www.amazon.de/gp/product/B07B65VN88/ref=ppx_yo_dt_b_asin_title_o01_s00
Velcro:
https://www.amazon.de/gp/product/B09V5BKYYP/ref=ppx_yo_dt_b_asin_title_o01_s00
(Optional) but almost a must! Tactical one point sling:
https://www.amazon.de/-/en/dp/B00VFAVA80/ref=sr_1_5
Elastic band for Index like controller straps:
Of course you need some sort of glue, as the pipes are glued into the 3d printed hinges and its a very tight fit! DONT! use superglue, you still need a bit of time to arange the glued together hinges so they are all in a straight line. Superglue would immediately stick to the aluminum pipes and there is no chance of correcting the angle!
I used “Loctite 60second universal glue”, its like superglue but it gives you around 60seconds before it really sticks, so plenty of time.
Print the “Breach_Pump_Action_Bumper_TPU” as the file name states in TPU! its there so the pump action does not cause unnecessary shock to the pico controllers.
You can also use some furniture felt at both ends if you dont have TPU filament at hand.
The controller cups are split in two parts, you can use 6x3mm round neodymium magnets on the lower part, but this is also optional as the Velcro does the main job here.
Use a strip of Velcro around both halves of the controller cups to hold it tight together!
Add one layer of isolation tape on the inside walls of both controller cups so it does not scratch the pico controllers and also grips the controller much much better.
Use M5 washers between the tightener knobs on the controller sliders otherwise your going to have a hard time tightening and reopening the knobs. ( check pictures for showcasing precise location)
Print parts just like shown in the previews and supports everywhere!
If you have problems getting the 8mm pipes through the sliding block, just use a 8mm drill bit and tap in both holes to get the perfect smooth sliding action. I did make it so tight on purpose, its easier to take some material off with the drill then adding some at this point ;) Nobody would likes a slider that wiggles of course.
You can adjust the “pull force” it takes to overcome the magnetic connection of the controller cups by adding layers of electrical tape on the magnet base, thin felt, or any other form of tape should work. The more layers the easier of course it will be to get the controller off the magnetic base. You maybe prefer a softer connection on the front handle and a stronger on the back or whatever rides your horse.
"BREACHER" Pico 4 VR magnetic Gunstock
by LWC · original on Printables ↗
Gadgets / Virtual Reality
♥ 119⬇ 1.0k🖨 7 prints
Print profiles
Breach_Hinge_Tightener.stl
⏱ time and weight estimated after preparation · 1 material(s)
Made to order: we prepare this file when you order, which adds a few minutes before printing starts.
Prints on: A1 mini 0.4PLA
Order this print
Breach_LEFT_Pumpaction_Controller_Slider.stlDEFAULT
⏱ time and weight estimated after preparation · 1 material(s)
Made to order: we prepare this file when you order, which adds a few minutes before printing starts.
Prints on: A1 mini 0.4PLA
Order this print
Breach_Cheek_Rest.stl
⏱ time and weight estimated after preparation · 1 material(s)
Made to order: we prepare this file when you order, which adds a few minutes before printing starts.
Prints on: A1 mini 0.4PLA
Order this print
Breach_Hinge_Set.stl
⏱ time and weight estimated after preparation · 1 material(s)
Made to order: we prepare this file when you order, which adds a few minutes before printing starts.
Prints on: A1 mini 0.4PLA
Order this print
Breach_Right_Controller_Slider.stl
⏱ time and weight estimated after preparation · 1 material(s)
Made to order: we prepare this file when you order, which adds a few minutes before printing starts.
Prints on: A1 mini 0.4PLA
Order this print
Breach_Buttstock.stl
⏱ time and weight estimated after preparation · 1 material(s)
Made to order: we prepare this file when you order, which adds a few minutes before printing starts.
Prints on: A1 mini 0.4PLA
Order this print
Breach_Sling_mount_clip.stl
⏱ time and weight estimated after preparation · 1 material(s)
Made to order: we prepare this file when you order, which adds a few minutes before printing starts.
Prints on: A1 mini 0.4PLA
Order this print
Breach_Magnetic_Lock_plate_and_hinge_LEFT_old_design.stl
⏱ time and weight estimated after preparation · 1 material(s)
Made to order: we prepare this file when you order, which adds a few minutes before printing starts.
Prints on: A1 mini 0.4PLA
Order this print
Breach_Magnetic_Lock_plate_and_hinge_RIGHTold_design.stl
⏱ time and weight estimated after preparation · 1 material(s)
Made to order: we prepare this file when you order, which adds a few minutes before printing starts.
Prints on: A1 mini 0.4PLA
Order this print
Breach_Left_Controller_Split_CUP_old_design.stl
⏱ time and weight estimated after preparation · 1 material(s)
Made to order: we prepare this file when you order, which adds a few minutes before printing starts.
Prints on: A1 mini 0.4PLA
Order this print
Breach_Right_Controller_Split_CUP_old_design.stl
⏱ time and weight estimated after preparation · 1 material(s)
Made to order: we prepare this file when you order, which adds a few minutes before printing starts.
Prints on: A1 mini 0.4PLA
Order this print
Breach_Magnetic_Lockplate_HEXA_and_hinge_LR.stl
⏱ time and weight estimated after preparation · 1 material(s)
Made to order: we prepare this file when you order, which adds a few minutes before printing starts.
Prints on: A1 mini 0.4PLA
Order this print
Breach_Left_Controller_Split_CUP_HEXA.stl
⏱ time and weight estimated after preparation · 1 material(s)
Made to order: we prepare this file when you order, which adds a few minutes before printing starts.
Prints on: A1 mini 0.4PLA
Order this print
Breach_Right_Controller_Split_CUP_HEXA.stl
⏱ time and weight estimated after preparation · 1 material(s)
Made to order: we prepare this file when you order, which adds a few minutes before printing starts.
Prints on: A1 mini 0.4PLA
Order this print
Breach_Level_Hinge.stl
⏱ time and weight estimated after preparation · 1 material(s)
Made to order: we prepare this file when you order, which adds a few minutes before printing starts.
Prints on: A1 mini 0.4PLA
Order this print
Breach_Magazine_Bumper_TPU.stl
⏱ time and weight estimated after preparation · 1 material(s)
Made to order: we prepare this file when you order, which adds a few minutes before printing starts.
Prints on: A1 mini 0.4PLA
Order this print
Breach_Controller_Frontcups_TPU.stl
⏱ time and weight estimated after preparation · 1 material(s)
Made to order: we prepare this file when you order, which adds a few minutes before printing starts.
Prints on: A1 mini 0.4PLA
Order this print
Breach_Buttstock_Pad.stl
⏱ time and weight estimated after preparation · 1 material(s)
Made to order: we prepare this file when you order, which adds a few minutes before printing starts.
Prints on: A1 mini 0.4PLA
Order this print
Breach_elastic_controller_strap_mount.stl
⏱ time and weight estimated after preparation · 1 material(s)
Made to order: we prepare this file when you order, which adds a few minutes before printing starts.
Prints on: A1 mini 0.4PLA
Order this print
Breach_Pump_Action_Bumper_TPU.stl
⏱ time and weight estimated after preparation · 1 material(s)
Made to order: we prepare this file when you order, which adds a few minutes before printing starts.
Prints on: A1 mini 0.4PLA
Order this print
Breach_Pump_Action_slider _Block_Set.stl
⏱ time and weight estimated after preparation · 1 material(s)
Made to order: we prepare this file when you order, which adds a few minutes before printing starts.
Prints on: A1 mini 0.4PLA
Order this print
Breach_Left_& Right controller for TPU Frontcups.stl
⏱ time and weight estimated after preparation · 1 material(s)
Made to order: we prepare this file when you order, which adds a few minutes before printing starts.
Prints on: A1 mini 0.4PLA
Order this print